Setup guide
About 5 minutes until you get your time back.
Before you start
You need:
- A Mac running macOS 13 or later
- An iPhone running iOS 16 or later
- A cable that connects them (Lightning or USB-C, whatever your phone uses)
Step 1: Download the app
-
Open the
.dmgin your Downloads folder, then drag the Timeback icon onto the Applications folder shortcut (both appear in the window that opens). - Open Timeback from your Applications folder or Spotlight.
Step 2: Sign in
- The app opens and asks for your email.
- Enter the email associated with your account.
- Click Send link.
- Check your email for a sign-in link from Timeback. It arrives within a few seconds. Check spam if you don't see it.
- Click the link. It opens the Timeback app and signs you in.
After signing in, you'll land on the home screen. A short checklist there covers the next steps: plugging in your phone and making a block.
Step 3: Plug in your iPhone
This is the step that asks the most of you, so here is what it does. Timeback puts the phone into supervised mode, the same mode schools and companies use on devices they hand out. That is what lets a block hold instead of being switched off in Settings.
Nothing is erased. Your apps, photos, messages, and accounts stay where they are, nothing needs reinstalling, and the phone is not reset. It restarts once.
- Plug your iPhone into the Mac with a cable.
- On the phone, tap Trust This Computer and enter your passcode. The prompt appears as soon as you plug in and unlock.
-
Turn off Find My on the phone. Its activation lock conflicts
with supervising the device, so setup cannot run while it is
on. You turn it back on at the end.
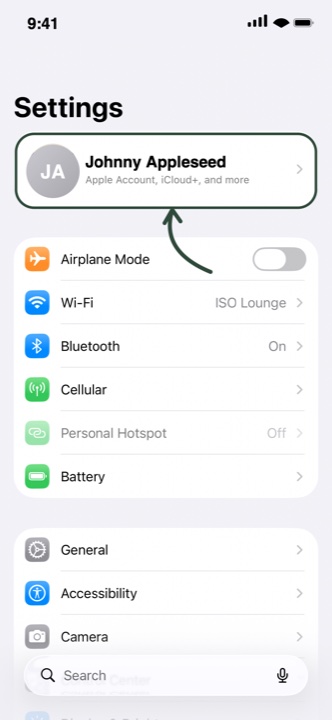
- Open Settings and tap your name at the top.
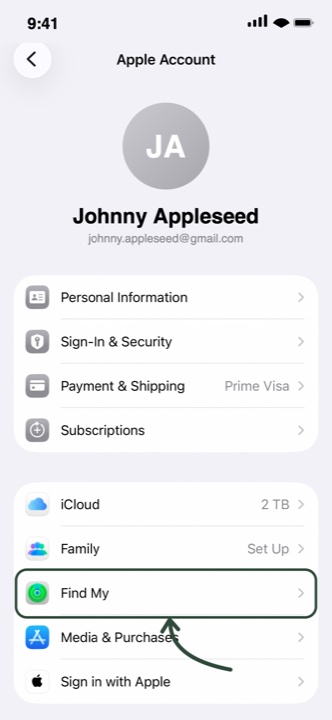
- Tap Find My.
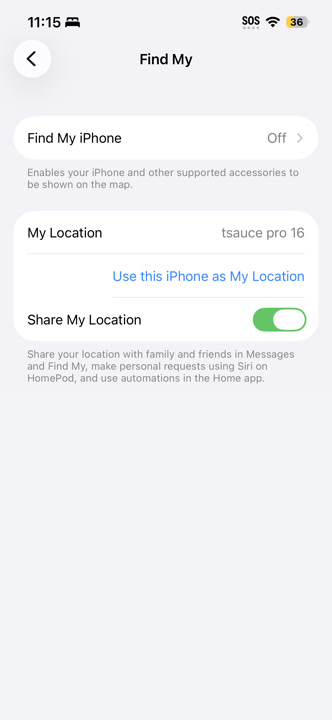
- Tap Find My iPhone.
- Turn it off.
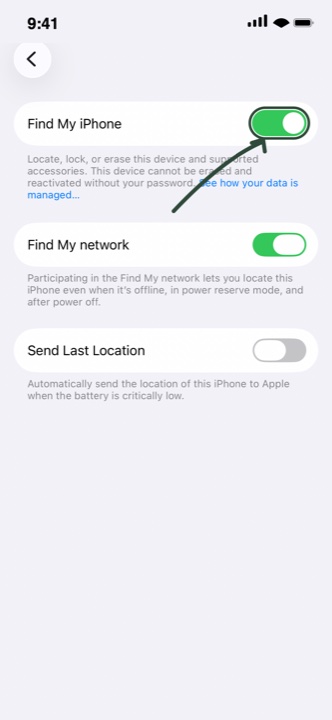
Enter your Apple ID password when asked.
-
- In Timeback on the Mac, click Connect your phone.
- The app supervises the phone, which includes a reboot. The screen tells you what's happening at each step.
- When the phone finishes rebooting, you'll see a Hello screen, then a Wi-Fi screen. Swipe up, enter your passcode, connect to Wi-Fi, and you're back at the home screen.
- Turn Find My back on.
- Check it worked. On the phone, open Settings. You should see This iPhone is supervised at the top, under your name. That is the phone telling you directly, rather than the Mac app telling you on its behalf.
Step 4: Make your first block
The home screen shows preset blocks (Social, Video, Games, and so on) and your own custom blocks. Click any preset to add it.
When you open a block, you'll see three things:
- Apps & sites: what's in the block.
- Breaks: how many you can take per day, and how long each break lasts.
- Lock: how hard it is to edit or remove the block, or change its break settings.
Breaks
For each block, you set a daily break budget.
To take a break, open the block, click Take a break, choose a duration, and plug in the phone if it isn't already. The break starts when the phone confirms. The apps come back on the phone for the duration of the break. When the break ends, plug the phone back in to restore the block.
Each block tracks a streak. If you don't plug the phone back in before the break ends, the streak on that block resets. Streaks are hidden by default, but you can turn them on in Settings.
If something goes wrong
Email [email protected] and say where it stopped. A screenshot helps.